Lesson about ageing and deterioration
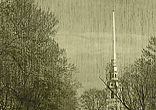
This is a lesson for those, who like old photos, for those, who want to try to stylize photos and make them look old. Sometimes using such a technique is defensible by the genre of the photo. For example, cityscape (if architecture allows), elements of buildings and objects of art, old constructions etc. Such a style is used very often at posed portrait genre together with corresponding entourage.
I tell all this for you to understand that applying this technique is useful, when it is really necessary to accentuate subject and composition....
Full text +
Out of the shadow
Frequently during picture retouching we have to change the object lightning, sometimes by changing time of the day from day to night. At this tutorial I will try to explain you what should be done to get such result from this original picture. Open the original picture at Photoshop. Create a new clean layer. Determine the main tonality of the original picture and choose the darkest colour of our tonality form the colour swatches. At this tutorial I used dark red (close to black). Fill the new layer with chosen colour and change layer’s features to “Multiply”....
Full text +
Simulate hair. Part: portrait afterwork. Recommendations.
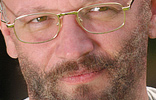
Retouching portrait we frequently face with a hair redesign problems. There are a lot of methods to modify haircuts or other object hair coats. On my opinion below method is the most successful. So I choose basic picture to learn how to simulate hair. Maybe we will modify beard?
We create new document (size 450x459 pixels). Then create new transparent layer Layer>New Layer. At the layer we paint a little hair with hard gray colour brush (diameter 2-3 pixels).
Then we go to Edit>Difine Brush Preset, find there our brush and name it “boroda”...
Full text +
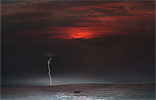
Expressive sky. Part: landscape after-work. Recommendations.

At this lesson we will study tools essential to give a sky at your picture expressiveness and tragedy.
These are low level corrections for those who have recently started working with graphics editors.
Let us start.
Well, for beginning we need any picture. Let us take the one we have already used before – picture of lonely fisherman.
I want to notice that it is desirable that your picture has a sky and it is very desirable the sky has surface pattern.
If it is not so and instead of sky and clouds you have white space then you need to import sky from another your picture. It is useful to have your own set of different kind of sky and clouds. As for me sometimes I took pictures of only sky and nothing else. The sky could be extremely beautiful if y...
Full text +
“Added product” definition. Photoergonomics (с).
Let us continue discussion “masterpiece button”. Today we will talk about added product. Remind you that before we studied picture as a “product” and use “three-level product analyze” conception for it. We divided the picture into added product, main product and essence. Thus, below is short review of “added product” (AP). Before I have already described what it is and what for you need it: image form (size), easy browsing (additional editing to easy browsing), tone, name etc. Let us see AP features using this picture as example:...
Full text +
«Essence» definition. Picture individuality and uniqueness.
This article is continuation of the discussion classified as “masterpiece button”. Here I will try to superficially explain the meaning of key concept - product essence. Remind you that in the last article we regarded picture as a product. We stated “three-level product analysis” definition and divided the product into added product, main product and essence. You can find the article here: Masterpiece tab. Marketing basis of the demanded picture creation.
I regard as a family album not pictures which we are keeping in albums and show our relatives, but pictures stored at your PC which we do not want to look over and can not remove (I have tones of such pictures).
...
Full text +
Nice views round-the-clock. Using of Photoshop in picture editing. Picture creation step-by-step.

This is one of my 1st tutorial, thus I treat it very sentimental. It is called Nice views round-the-clock.
Studied at this lesson principles and basic instruments of collage creation could seem exaggerated but very useful form practical point of view.
Now let us start!
Step 1. You took a picture. The better quality of the picture the less work on the picture in future. Open Photoshop. Create Layer duplicate (Layer 1).
Step 2. Press Ctrl+L, and correct WB (I will not explain how to do it, because you should know it. If you do not know so press «Auto level» - and you will get acceptable quality).
...
Full text +
Isaac’s Chathedral Angels. Night shooting at noon.

Believe most of yours saw my picture “Isaac’s Chathedral Angels”. I have a lot of questions where you ask me: “Did you really take this picture at night?”, “I’ve seen a picture with the same effect which was taken at day, and I am sure you know how it could be done”, “Could you give us a lesson about it?” etc.
I will share with you some secrets and will try to describe the process of this picture creation. The 1rst that should be said – this is a collage, Photoshop. Unfortunately I did not save PSD file, thus we are to create the same picture from the beginning....
Full text +
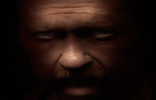
Eyes - mirror of the soul. Part: portrait afterwork. Recommendations.
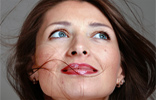
While taking a portrait we are trying to catch the most unusual and expressive way of light on special parts of object. Looking for an interesting light-to-dark pattern we can neglect of trivial details. It seems incredible but namely eyes could be the trivial details if your goal is not taking a picture of eyes. From the other side this is the detail that transfers person emotion as well as creates spirit of the image. What should we do?
In spite of the miracle light we use at the studio it is advisable to do eyes afterwork to create person image more expressive. It could be done by using additional point light source (directed to the eyes). An object generally is in motion therefore this method is not suitable. It would be easier to improve the image in e...
Full text +